
DIY Arduino UNO Radar with Ultrasonic Sensor — Free Arduino IDE Code & Servo
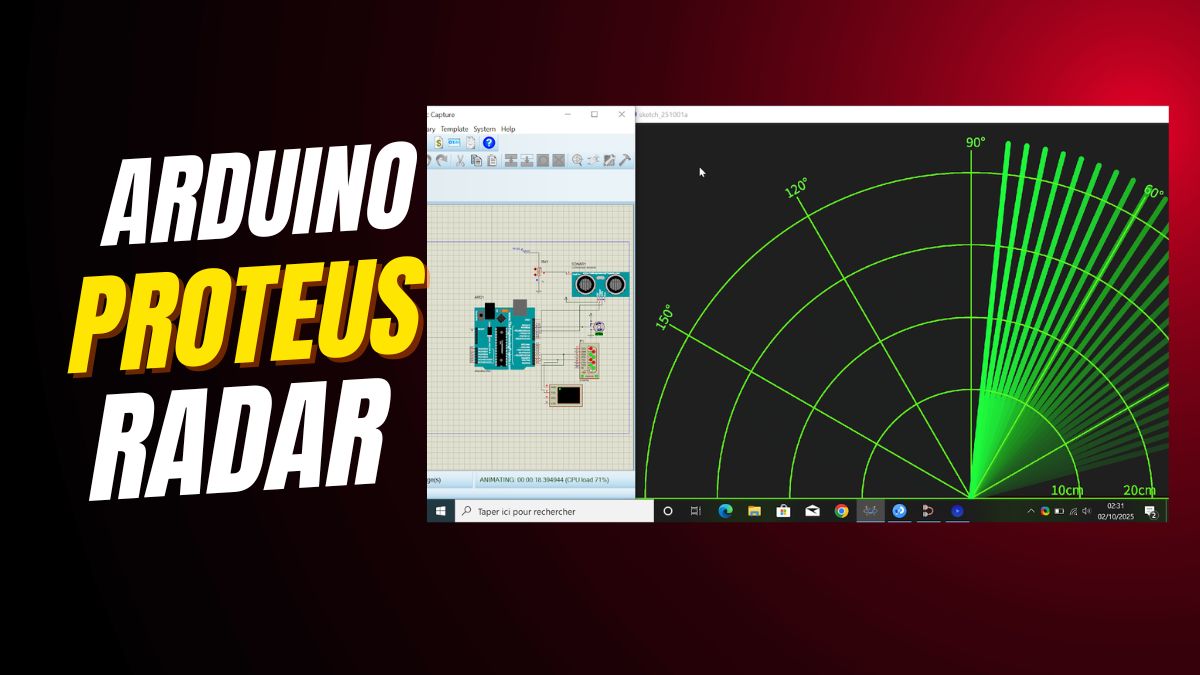

DIY Arduino Radar
Learning electronics can be fun, especially when you can see your project come to life. A DIY Arduino Radar simulation in Proteus is a great way to combine coding, electronics, and visualization. In this hands-on guide, you will learn to build a fully functional radar simulation using an Arduino Uno, an Ultrasonic Sensor, and a Servo Motor. Moreover, you will see how to display the radar sweep using Processing IDE for real-time visualization. This project helps you master not only sensor-based systems but also embedded simulation tools.
With this step-by-step article, you will understand how to connect your components, upload your Arduino program, and simulate everything in Proteus before building the hardware. So, let’s begin this exciting journey into the world of smart, sensor-controlled electronics.
Understanding the DIY Arduino Radar Simulation
Before diving deeper, it is important to understand how our DIY Arduino Radar works. The project mimics the same concepts that real radar systems use to detect and map objects. The radar constantly sends ultrasonic pulses through an HC-SR04 sensor and listens for the echo. As a result, it detects the time difference between sending and receiving signals to measure distance.
The Servo Motor plays a vital role here. It rotates the sensor from 15° to 165° in small steps, scanning the surroundings. Every angle gives a unique distance reading. Eventually, this data reaches the Processing software on your computer, which turns it into a moving, glowing green radar screen.
Consequently, you can visualize your environment exactly like a real radar does — live and accurate. Therefore, this project is not only educational but also very entertaining.
Essential Components for the Arduino Radar
To build your own DIY Arduino Radar Simulation, you need a few basic electronic parts. All components are easily available and affordable, which makes this an excellent project for beginners.
- Arduino Uno – acts as the brain of the system.
- Ultrasonic Sensor (HC-SR04) – sends sound pulses and measures echoes.
- Servo Motor (SG90) – rotates the sensor to scan different angles.
- Breadboard (optional) – helps in tidy wiring.
- Jumper Wires – used for all connections.
Together, these parts make a complete radar model that you can simulate, analyze, and visualize right from your computer using Proteus and Processing IDE.
Pin Connections for Arduino Radar Circuit
Setting up the correct pin connections is crucial to make your radar work flawlessly. The following pin configuration ensures accuracy and smooth performance.
| Component | Pin on Component | Pin on Arduino Uno | Notes |
|---|---|---|---|
| Ultrasonic Sensor | VCC | 5V | Power supply |
| Ultrasonic Sensor | GND | GND | Ground |
| Ultrasonic Sensor | TRIG | D10 | Trigger pin |
| Ultrasonic Sensor | ECHO | D11 | Echo pin |
| Servo Motor | VCC | 5V | Power supply |
| Servo Motor | GND | GND | Common ground |
| Servo Motor | Signal | D12 | Control signal |
| Arduino Uno | USB | PC Port | Serial communication |
Each pin has a clear function, and the connections remain simple enough for beginners to handle. After that, you can upload your code and start testing your radar.
How the Arduino Radar Simulation Works
As soon as you run the project, the Servo Motor begins rotating from left to right. At every angle, it triggers the Ultrasonic Sensor to send out pulses. The time it takes for the signal to return gives the distance of an obstacle. In this way, the radar keeps scanning its surroundings continuously.
The Arduino combines all the readings and sends them to the Processing IDE. As a result, the data transforms into a bright green radar display with red signals where obstacles appear. It looks very similar to a professional radar used in ships or airports.
This method helps students visualize how sensors, motors, and serial communication work together. It shows how simple systems can mimic complex real-world technology.
Arduino Code Implementation
Let’s now look at the core Arduino sketch for the radar. The code moves the servo and reads distance values using the ultrasonic sensor. Every measurement is printed through the serial port.
// Define pin connections

const int trigPin = 10;

const int echoPin = 11;

const int servoPin = 12;

long duration;

int distance;

#include <Servo.h>

Servo myServo;

void setup() {

Serial.begin(9600);

pinMode(trigPin, OUTPUT);

pinMode(echoPin, INPUT);

myServo.attach(servoPin);

}

void loop() {

for (int i = 15; i <= 165; i++) {

myServo.write(i);

delay(30);

distance = calculateDistance();

Serial.print(i);

Serial.print(",");

Serial.println(distance);

}

for (int i = 165; i >= 15; i--) {

myServo.write(i);

delay(30);

distance = calculateDistance();

Serial.print(i);

Serial.print(",");

Serial.println(distance);

}

}

int calculateDistance() {

digitalWrite(trigPin, LOW);

delayMicroseconds(2);

digitalWrite(trigPin, HIGH);

delayMicroseconds(10);

digitalWrite(trigPin, LOW);

duration = pulseIn(echoPin, HIGH);

distance = duration * 0.034 / 2;

return distance;

}
This code perfectly synchronizes the rotation of the servo with the distance readings. Furthermore, the serial data can easily be read by Processing to visualize the radar sweep.
Running the Simulation in Proteus
Before testing on physical components, it is wise to simulate your setup in Proteus. This method lets you find errors and correct them without damaging your hardware. Proteus offers a simple and visual way to confirm connections and code results.
Firstly, open Proteus 8 Professional and create a new project. Secondly, place the Arduino Uno, HC-SR04 sensor, and Servo Motor from the component library. Then, wire them as per the connection table you saw earlier. Next, double-click on the Arduino model and load your compiled .hex file (exported from the Arduino IDE).
Finally, click the Run button. The simulation will start immediately, showing your servo sweeping back and forth while the ultrasonic sensor measures distances. This result confirms that the hardware logic is correct. Seeing your idea working visually builds confidence before moving to the actual circuit.
Creating the Radar Display with Processing IDE
While Proteus simulates the hardware, the Processing IDE displays the radar visually. By connecting to the Arduino’s serial port, Processing translates numeric data into a sweeping radar effect.
The radar display appears as a green, semi-circular screen. As the servo rotates, the line sweeps across like a real radar, marking detected objects in red. The display continuously refreshes, so you see moving objects in real time. This makes the project both interactive and visually appealing.
Additionally, the Processing code can be modified to change colors, radar sensitivity, and sweep speed. As a result, you can easily customize the user interface to make it your own.
Advantages of DIY Arduino Radar Simulation
Beyond being a fun project, a DIY Arduino Radar has many educational benefits. Most importantly, it teaches multiple concepts simultaneously. You will learn servo control, distance measurement, serial communication, and real-time visualization together.
Equally important, this radar project trains you in simulation workflows before dealing with physical circuits. As a result, you save time, avoid errors, and gain deeper insight into sensor operation. Moreover, these foundational skills form the base for more advanced projects such as robots, obstacle detection systems, and smart surveillance devices.
Why Use Proteus for Simulation
Proteus simplifies design testing. Since it simulates circuits in real time, you can monitor how each component behaves under various conditions. Furthermore, any connection mistake or logical error becomes visible right away.
Another advantage is that you can integrate the same sketch you upload to your Arduino board into Proteus. This consistency guarantees that what you see in simulation will work identically on your real setup.
Learning Outcomes from Arduino Radar Simulation
After completing your radar simulation, you will have learned several key engineering concepts. Firstly, you will understand how to control servo motors with precision. Secondly, you will explore ultrasonic sensing methods and learn how sensors detect distance. Thirdly, you will grasp serial data communication between hardware and software.
In addition, you will gain exposure to Proteus simulation—a skill valued in electronics design and education fields. As a result, you develop confidence for future embedded system projects. Together, these skills make you more creative and technically capable.
Tips for Testing and Debugging Radar in Proteus
Testing plays a vital role in making your radar accurate. Always begin by checking your power connections and ground circuits. Then verify that the Trigger and Echo pins are correctly linked. If the radar shows unstable readings, adjust your servo delay or check the serial baud rate.
Additionally, make sure your ultrasonic sensor has a clear line of sight. Unlike infrared sensors, ultrasonic waves reflect differently, so stable readings depend on smooth surfaces. Finally, fine-tune your range mapping in code to calibrate real measurements with virtual ones.
Expanding the DIY Arduino Radar Project
Once you understand the basics, you can extend your DIY Arduino Radar to make it smarter. For example, you can add Bluetooth to send radar data to your smartphone or integrate an LCD display to show distance values directly. Moreover, adding LEDs or buzzers can help alert the user of nearby obstacles.
Furthermore, you could combine this radar with a small mobile robot to create an obstacle-avoiding system. Step by step, these expansions transform a simple learning project into a real-world application, blending creativity with technology.
Conclusion: Why Try Arduino Radar Simulation
To sum up, building a DIY Arduino Radar Simulation in Proteus offers an exciting and practical path to learn embedded systems. You not only build and test electronic circuits but also visualize how sensors and motors interact in real time.
Overall, this project helps beginners understand complex systems in a fun and hands-on way. It encourages critical thinking, logical coding, and design precision. Whether you are a student, a hobbyist, or an educator, this radar simulation serves as a rewarding experiment that deepens your electronics knowledge and fuels creativity.
If you're working on ESP32 simulations, you may find this ESP32 Proteus tutorial useful for setting up and testing your circuits virtually. Also, if you've ever struggled to locate the missing library folders in Proteus, this guide on how to find the Proteus library folder easily will save you time. For those comparing microcontroller boards, check out this detailed breakdown of the differences between Arduino and Elegoo: Which one to buy in 2025. And if you're still deciding which model fits your project needs best, this comparison guide on the right Arduino-compatible board offers a simple explanation to help you choose confidently.
The Engineer Post
Embedded systems engineer and educator. Writes weekly tutorials at EmbedLab to help beginners ship real hardware.
Related projects
DIY Arduino UNO Radar — Ultrasonic Sensor, Servo & Free Arduino IDE Code
Build a DIY Arduino UNO radar with the HC-SR04 ultrasonic sensor, a servo motor and Processing visualization: free Arduino IDE code and Arduino library — also works on Arduino Nano, Arduino Mega and ESP32 Arduino.
Smart Parking System with Arduino UNO — Real-Time LCD Monitoring & Automated Gate
Build a smart parking system with Arduino UNO featuring real-time LCD monitoring, IR sensors and an automated servo gate: free Arduino IDE code and Arduino library — easily upgraded to Arduino Mega and ESP32 Arduino for IoT.
Arduino UNO Ultrasonic Project — HC-SR04 Distance Sensor with Free Arduino IDE Code
Build an Arduino UNO ultrasonic distance project with the HC-SR04 sensor and LCD display: free Arduino IDE code and Arduino library — easily ported to Arduino Nano, Arduino Mega and ESP32 Arduino.

Interface SPI EEPROM with Arduino UNO — Free Arduino IDE Code & Library
How to interface an SPI EEPROM with Arduino UNO step by step: free Arduino IDE code, Arduino library, full wiring map — easily ported to Arduino Nano, Arduino Mega and ESP32 Arduino.

Arduino UNO Calculator with LCD & Keypad — Free Arduino IDE Code & Library
Build an Arduino UNO calculator with an LCD display and 4x4 keypad: free Arduino IDE code, Arduino library and complete wiring — easily ported to Arduino Nano, Arduino Mega and ESP32 Arduino.